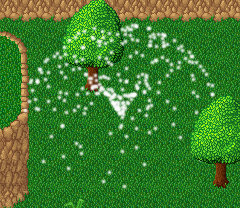
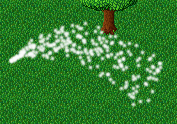
This will become a tutorial for creating particle effects. Still under construction.
Basics
What is the particle engine?
The particle engine is a system to create dynamic graphic effects by creating a large number of small objects called particles which move through the game world independently. These particles are created by so-called emitters which are also particles and thus can (but don't have to) move through the world. By defining the physical properties and behavior rules of emitters and the particles they create you can create a vast range of beautiful effects like waterfalls, fire or all kind of magic phenomenons.
Although the TMW engine is usually two-dimensional the particle engine sees the world as a flat ground in a three-dimensional space and can move particles in all three dimensions. Thus it is very easy to create an illusion of 3d with the particle engine.
where are the files for what purpose
All particle-related files can be found in the folder data/graphics/particles in the tmw data files which you can get from SVN or from unpacking the updates you can find a tutorial how to get these files on the forum.
In this folder you can find a number of .png files. These are the particle images you can use to represent your particles in the game world. And then there are a number of .particle.xml files. These are particle effect definition files which define the properties of emitters and particles for different particle effects. During this tutorial you will learn how to write these files yourself and enrich the mana world with new, astounding particle effects.
how can particle effects be added to maps
Particle effects can be placed on maps where they immediately catch the eye of the player. Please refer to Particle_engine#Putting_particle_effects_on_maps for details.
how can particle effects be added to NPCs
- TODO: describe how to add an edit the npcs.xml file and add a <particlefx> tag to an NPC.
Blinking
The first particle effect we are going to create is a bunch of blinking stars which tell the player "something magical is here". We will do so by creating an emitter which spawns particles in a box of 32x32x32 pixels. We will make the particles look like stars, constantly spawn new ones (one every game tick or 10ms) and we will make each of them disappear again after 10 game ticks (100ms). They will not move - we will have moving particles in the next tutorial.
First we start with the basic structure of a particle effect definition:
 <?xml version="1.0"?>
 <effect>
  <particle>
  </particle>
 </effect>
What does this do? The first line defines that it is an XML file. XML is a markup language for representing all kinds of hierarchical data like our particle effects. Wikipedia got a nice article about the XML language, when you are interested in details of the language. The second line, <effect> says, that the definition of a particle effect will follow. Every particle effect needs to have at least one particle, the so-called root particle. The line <particle> says that we are now going to start defining one. We will soon equip this root particle with a particle emitter to make it create new particles. But this will come in the next step. So we finish its definition with the tag </particle>. We only need one root particle for this effect so we write </effect> to mark the end of the definition of this effect.
Now we are going to equip the particle with an emitter so that it creates new particles. We do it by adding an <emitter> child tag to the particle tag. The file will now look like this:
 <?xml version="1.0"?>
 <effect>
  <particle>
   <emitter>
   </emitter>
  </particle>
 </effect>
The next thing we have to do is explain the emitter what properties the particles it creates are supposed to have. We do so by adding a bunch of <property> child elements to the emitter. Each property tag defines one property of the particles and its possible values. The value can either be fixed, in this case it looks like this: <property name="foo" value="bar" />, or we can define the value in a range between two values like this: <property name="foo" min="bar" max="baz"/>. in the latter case every created particle will have a random value in the given range.
I explained the meaning of each property in the following example with an XML comment. A comment is everything which is written between "<!--" and "-->". When you create more complex particle effects with multiple emitters you should write some comments too so that you remember which part of the file is for what purpose. You should also begin each particle effect with a comment describing how the effect looks, how many particles it requires and how much effect it has on the framerate.
 <?xml version="1.0"?>
 <effect>
  <particle>
   <emitter>
    <property name="output" value= "1" />                              <!-- We want one new particle per game tick -->
    <property name="lifetime" value= "10" />                           <!-- we want each particle to survive for 10 game ticks -->
    <property name="image" value="graphics/particles/star-medium.png"/><!-- We want the particles to look like white stars. -->
    <property name="position-x" min="0" max="32" />                    <!-- We want the particles to be spawned in an area 32 pixels wide...-->
    <property name="position-y" min="0" max="32" />                    <!-- ...32 pixels deep and...-->
    <property name="position-z" min="0" max="32" />                    <!-- ...32 pixels high.  -->
   </emitter>
  </particle>
 </effect>
When you want to know more about the properties a particle can have and what exactly the values mean you should check out the particle engine documentation.
Exercise: Make a box with the double size and with a different particle:
- TODO: Write about common mistakes when the particle effect doesn't show up ingame.
Water Fountain
Moving particles with physics.
- horizontal- and vertical-angle
- power
- gravity
- Killed by floor contact
 <?xml version="1.0"?>
 <effect>
  <particle>
   <emitter>
    <!-- no position-bla this time - all particles are spawned at the same point. -->
    <property name="output" value= "4" />                  <!-- This time we need some more particles-->
    <property name="horizontal-angle" min="0" max="360" /> <!-- launched in a full horizontal circle -->
    <property name="vertical-angle" value="45" />          <!-- launched in a fixed vertical angle -->
    <property name="power" value="3" />                    <!-- Initial speed of 3 pixels per tick -->
    <property name="gravity" value="0.1" />                <!-- Accelerated by 0.1 pixels per game tick to the ground -->
    <property name="image" value="graphics/particles/orb-medium.png"/><!-- This time we use the orb sprite. -->
   </emitter>
  </particle>
 </effect>
Exercise: Make a "Firehose" which launches the particles in a narrow stream:
Fireball Fountain
- Nested emitters
- bounce
- animation
Orbiting Spheres
- acceleration
- momentum
- die-distance
- dyeing
Smoke puffs
Demonstrates the use of nested emitters for pulsating effects using the nomads pipe as an example
- fade-in
- fade-out
- Negative minimum output for irregular output
- Using nested emitters for timing purpose
Triangle in circle
- Using nested emitter for circular and linear effects
- Using trigonometrical calculations for creating geometric shapes.


