This article contains information for players or people interested in playing The Mana World rEvolt. If you're interested for the Classic game, please go to the Classic portal.
This article is for reference purpose
The features described in this article are already implemented in the game. The article should describe how a certain aspect of the game currently works. You may of course edit this article to improve the description of the circumstances. Your opinions or improvement suggestions about the described aspects themself are of course appreciated, too. But please put these on the discussion page of this article to keep facts and fiction separated.
| Quest Overview | |
|---|---|
 | |
| Starting Location | 009-4 Beneath Hurnscald |
| Level | 1 |
| Prerequisites | None |
| Redoable | No, only once |
What To Do:
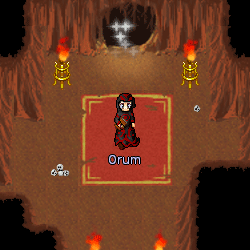
- Go to the Hurnscald Inn and take the stairs going down. Once you are in the next section, start heading down and to the right (southeast). You will see a small cave entrance on the left after you are almost at the bottom. Head inside to find Orum.
- Talk to Orum, he will tell you he needs help to save Waric, his friend that got kidnapped.
- First, you must collect for him 4 Wisp Powders, 2 Poltergeist Powders, 1 Spectre Powder, and 1 Hard Spike (all of these are available from Aidan And Ishi's Monster Points) to get past the entrance below Orum. This is where the quest really starts to get interesting.
- Start by going to the right and talk to the only Torch you can get to. After that, go back and talk about to Orum, and he will tell you to get more stuff.
- For the materials you need to start the caves below, you'll need the powders. Get him 10 Iron Powders, 10 Piles of Ash, 15 Gamboge Herbs, 15 Alizarin Herbs, and 15 Cobalt Herbs. You will receive 10 Red Powders, 10 Blue Powders, and 10 Yellow Powders. You will need them for the Torches.
- In the next cave, there are four barriers (from north to south): broken, final, middle, and south.
- Torch 1 is behind the broken barrier (the first one you talked to), Torch 2 is behind the middle barrier and Torch 3 is behind the south barrier.
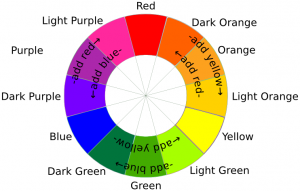
- Start by opening the middle. To open the middle barrier, try to run through it and see what color it is, and then set Torch 1 to its color (use the tables shown below).
- Next, open the south barrier. Go to the south barrier and run through it to see what color it is, and then set Torches 1 and 2 to colors that can compose the last color wanted for the 2nd barrier in either order (Use 1st table below). For example first Torch needs to be Red and Torch 2 needs to be Yellow to open the 3rd barrier that is Orange (Red + Yellow = Orange). Note! If you change the torch 1 color to something else it might close your ability to get to torch 2, so choose your colors wisely so you do not have to gather materials again!
- Finally, open the final barrier. This time, run through it to see its color, and match all three torches to match. Do the same thing as before but use the 2nd table shown here. Be careful not to ruin your previous barriers! Choose wisely!
- Once you have completed going through, go back and talk to Orum and promise him you will not go into the last cave. You will receive a Candle Helmet (+16 Defense, -1 Agility, +1 Intelligence). Of course you will not do as promised.
- Go down into the last cave you opened. Head south. You will be warped between Waric and Orum. They are actually bad guys!
- You will then appear near the south entrance of Hurnscald. You are now finished with this quest!
Hints:
- A lot of the items needed are available from Aidan And Ishi's Monster Points.
- When you will finish the quest, you will not be able to see Orum or Waric again here. This is also why you are not in the same caves as players that didn't finish the quest.
- If you do the quest well without losing Powders, you will only use 10 of each maximum.
Primary colors:
- Red
- Blue
- Yellow
Colors composed of 2 primary colors:
| First color | Second color | Color produced |
|---|---|---|
| Red | Yellow | Orange |
| Blue | Yellow | Green |
| Blue | Red | Purple |
Colors composed of 3 primary colors:
| First color | Second color | Third color | Color produced |
|---|---|---|---|
| Red | Yellow | Yellow | Light Orange |
| Red | Red | Yellow | Dark Orange |
| Blue | Yellow | Yellow | Light Green |
| Blue | Blue | Yellow | Dark Green |
| Red | Red | Blue | Light Purple |
| Red | Blue | Blue | Dark Purple |
Wisp Powders are dropped by:
- Wisp (5%)
Poltergeist Powders are dropped by:
- Poltergeist (5%)
Spectre Powders are dropped by:
- Spectre (5%)
Hard Spikes are dropped by:
- Spiky Mushroom (1.5%)
Iron Powder sources:
- Rauk The Alchemist will convert 1 Iron Ore to 4 Iron Powders for the price of 100 GP.
- Trader in Tulimshar Bazaar will convert 1 Iron Ore to 4 Iron Powders for the price of 1000 GP.
- The #zukminbirf Spell will sometimes transmute 1 Iron Ore to 1 to 6 Iron Powders.
- The Dimond Sword rewards you with 5 Iron Powders when you learn the #ingrav spell.
- Vicious Squirrel drop (70%)
- Undead Witch drop (1%)
Piles of Ash are dropped by:
- Fire Skull (50%)
- Fire Goblin (5%)
Gamboge Herbs are dropped by:
- Gambode Herbs (30% + 30% + 30%)
- Squirrel (10%)
Alizarin Herbs are dropped by:
- Alizarin Herbs (30% + 30% + 30%)
- Squirrel (10%)
Cobalt Herbs are dropped by:
- Cobalt Herbs (30% + 30% + 30%)
- Squirrel (10%)
Reward:
- 1 Candle Helmet (+16 Defense, -1 Agility, +1 Intelligence)
- 5000 EXP
Total Cost:
- 4 Wisp Powders
- 2 Poltergeist Powders
- 1 Spectre Powder
- 1 Hard Spike
- 10 Iron Powders
- 10 Piles of Ash
- 15 Gamboge Herbs
- 15 Alizarin Herbs
- 15 Cobalt Herbs
