| Line 54: | Line 54: | ||
In this layer you define regions, where the rules are found. | In this layer you define regions, where the rules are found. | ||
One coherent region describes one rule. | One coherent region describes one rule. | ||
It does not matter which tiles are used for describing where the region is. | It does not matter which tiles are used for describing where the region is, but these tiles must be all the same. | ||
(decision is boolean: either there are tiles or not) | (decision is boolean: either there are tiles or not) | ||
- "ruleSet" | - "ruleSet" | ||
Revision as of 14:51, 21 September 2010
What is the Automapping feature?
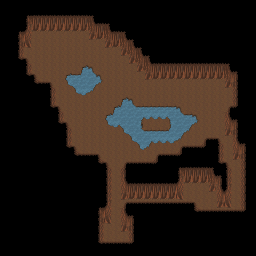
Guess you want to make a map, which looks this:
So you have an idea how the form of the cave is. Now you must create this map. How long does it take? maybe an hour?
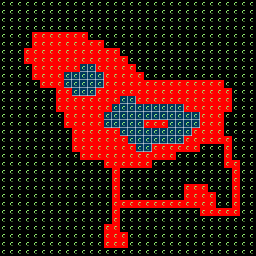
With the automapping feature you just draw the outline of the cave which looks like this:
What are the advantages?
- just one layer to edit
- just draw what you mean there should be (cave in the middle with a little sea)
- no need for drawing and combining many tiles for the wall. This is done automatically
So this feature generates from the given draft the cave. How long does it take to make such an one-layer draft? 10 minutes?
How to use it?
The automapping feature needs to know how the tiles have to be setup, to create such an cave-wall. So we got to create some rules how these walls are generated.
Create a new map
Create a new map. Save this map where ever you want. I suggest the tmwdata/maps folder of the "tmwdata" project from our Git repository.
setup rules.txt
Within the same folder of your map there needs to be a textfile "rules.txt", which contains pathes to rulefiles.
Check if there is such an file. If not put something like this: Media:Automapping_example_rules.txt
Each line give a path to rules. This path can (should) be relative to the directory with rules.txt and your map. The rules will be applied in that order as in this file. So at first the rules in the very first line are applied. At last the very last line rules are applied.
setup the rules.tmx
Now we need to make the rules with tiled and these rules need to be saved to the path given in the textfile of step 2.
But first we need to identify these rules:
structure of rules files
Let us have some theory first:
These Tilelayers are needed in rule-defining maps:
- "ruleRegions"
In this layer you define regions, where the rules are found.
One coherent region describes one rule.
It does not matter which tiles are used for describing where the region is, but these tiles must be all the same.
(decision is boolean: either there are tiles or not)
- "ruleSet"
Here you put the information, which condition must be matched, that this rule is applied.
- layers describing the terrain in the rule.
These layers have the prefix "rule_"
In the "rule_XXX" layer you put the information how the terrain is
in the usual XXX layer.
working on your map
have fun with the automapping feature... Since Undo/Redo works, you can easily try out, if it works.
Example of rules: Rule_cave_002
some pictures
explanation of the file, describing the rules
In this section we will have a closer look to the Layers of the file Rules_cave_002.tmx:
The RuleRegions is always shown for better orientation.


