From The Mana World
m |
|||
| (52 intermediate revisions by 7 users not shown) | |||
| Line 1: | Line 1: | ||
{{Meta}}{{I18n}} | {{Meta}}{{I18n}} | ||
{{Status Under Construction|Some of the links may not work. These will be fixed shortly.}} | {{Status Under Construction|Some of the links may not work. These will be fixed shortly.}} | ||
{{Category | {{Category Classicplayerinfo}} | ||
{{Quest | {{Quest | ||
|Image = [[ | |Image = [[File:Alacrius context.png]] | ||
|Start = 027-2 The Crypt | |Start = 027-2 The Crypt | ||
|Level = | |Level = 90+ recommended 60 required | ||
|Prerequisites = 300 [[ | |Prerequisites = 300 [[Classic:Boss Points|Boss Points]] | ||
|Reward = Knowledge of how to enter [[ | |Reward = Knowledge of how to enter [[Classic:Keshlam Swamp|Keshlam Swamp]] | ||
|Cost = None | |Cost = None | ||
}} | }} | ||
'''What | '''What to Do:''' | ||
# To get there, head to the Graveyard. | # To get there, head to the [[Classic_Graveyard|Graveyard]]. | ||
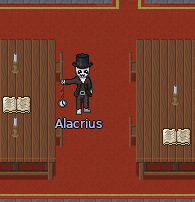
# Enter the Crypt and go to the room on the right to talk to Alacrius. | # Enter the [[Classic:Crypt|Crypt]] and go to the room on the right to talk to Alacrius. | ||
# Read the two books on the top floor and the book on | # Read the two books on the top floor and the book on Basement level 1. | ||
# Examine the correct sarcophagi(coffins) on your way to | # Examine the correct sarcophagi (coffins) on your way to Basement level 2. | ||
# Examine the correct statues on | # Examine the correct statues on Basement level 2. | ||
# Examine all five gates on | # Examine all five gates on Basement level 3. | ||
# Solve the riddle. | # Solve the riddle. | ||
'''Hints:''' | '''Hints:''' | ||
* Go with a group of players or a high level friend into the crypt to increase your | * The 300 Boss Points are only needed once for each account. If it was done with one character all characters on the same account can use it in the ritual without getting the boss points and talking to Alacrius again. | ||
* Have a pen and paper handy to write down what you learn from the clues. | |||
* The gates on Basement level 3 (Words of God) will tell you the order in which to read the clues. Krukan's clues are the statues across from the unbroken windows on Basement level 2, and Razha's clues are the closed sarcophagi (coffins) on Basement level 1. | |||
* You will need to lure monsters away while trying to read the clues. Go with a group of players or a high level friend into the crypt to increase your chances of surviving the monsters that guard the clues. | |||
{| class="wikitable mw-collapsible mw-collapsed" | {| class="wikitable mw-collapsible mw-collapsed" | ||
|- | |- | ||
!Spoiler | !Spoiler: Clues | ||
|- | |- | ||
| ''' | |<div style="font-size:18px">'''Clues'''</div> | ||
* | * The clues include directionals for the two sides of Terogan's chamber, and there are six per side. These are needed in order to know where to stand when lighting the candles that take you to Keshlam Swamp. | ||
* | * The six directionals on the left side are different from the right side. Although not necessary, it is recommended that you get the directionals for both sides. | ||
* The | * The directionals are different for every account, but remain the same for all characters on an account. | ||
* The directionals are as follows: | |||
**'''northwest''' (NW) | |||
**'''northeast''' (NE) | |||
**'''southwest''' (SW) | |||
**'''southeast''' (SE) | |||
**'''south''' (S) | |||
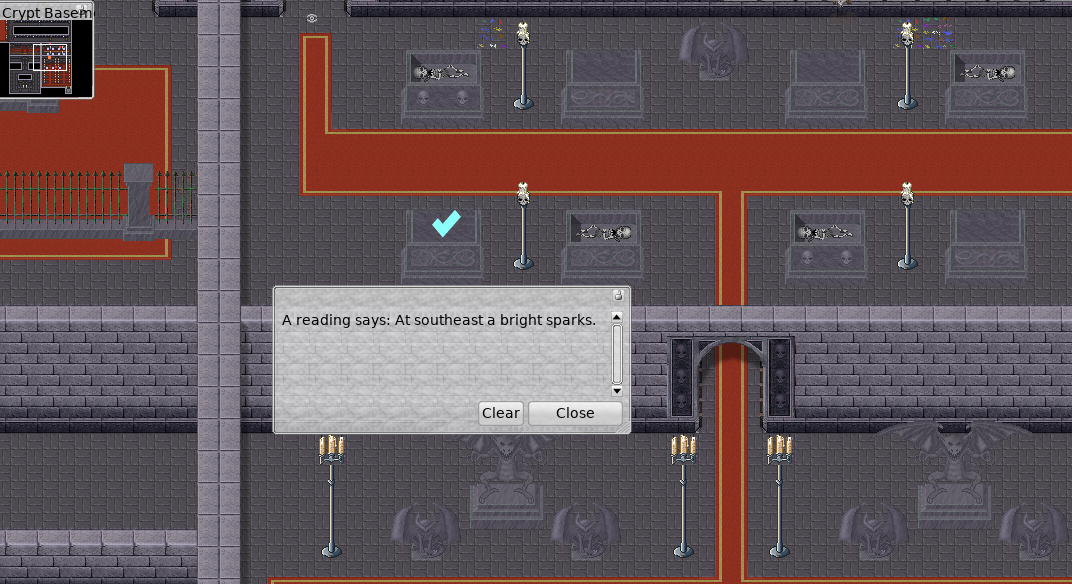
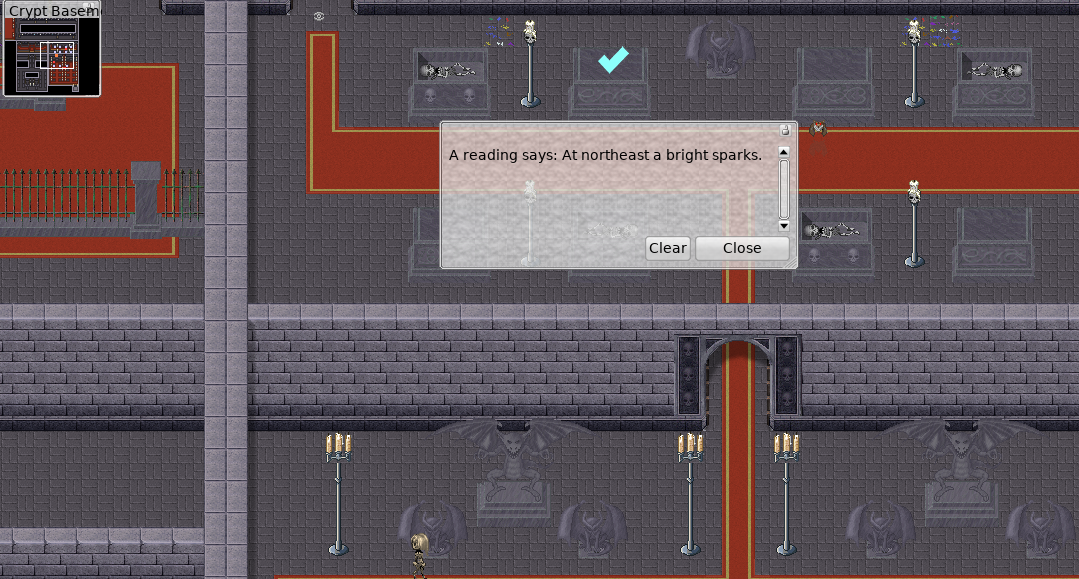
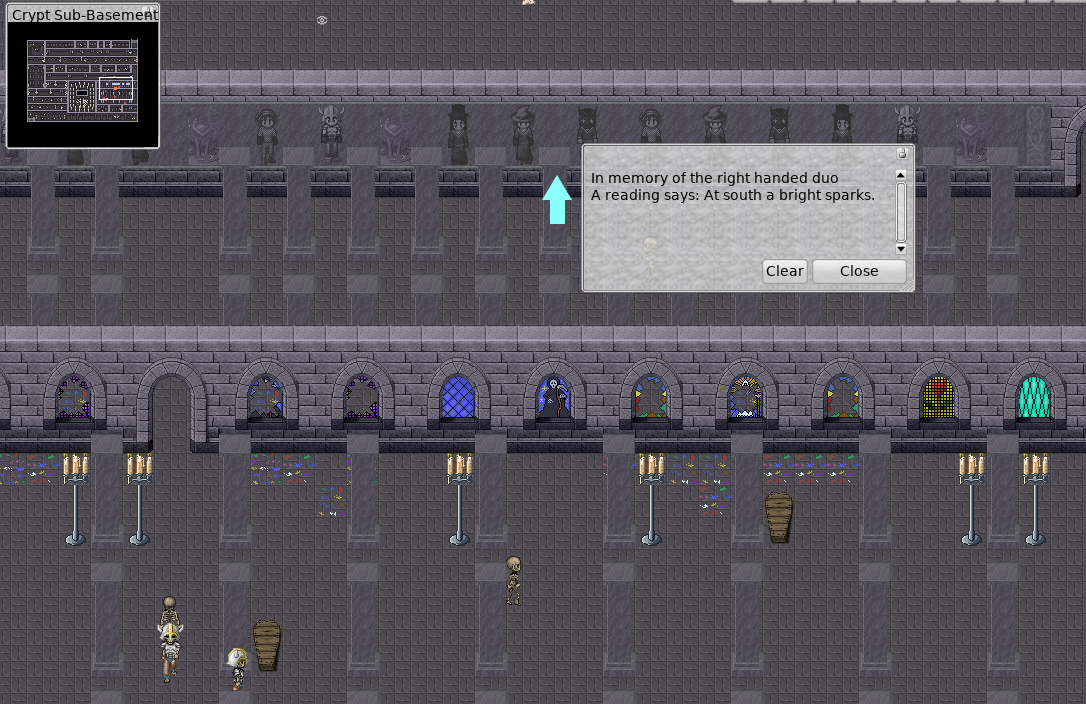
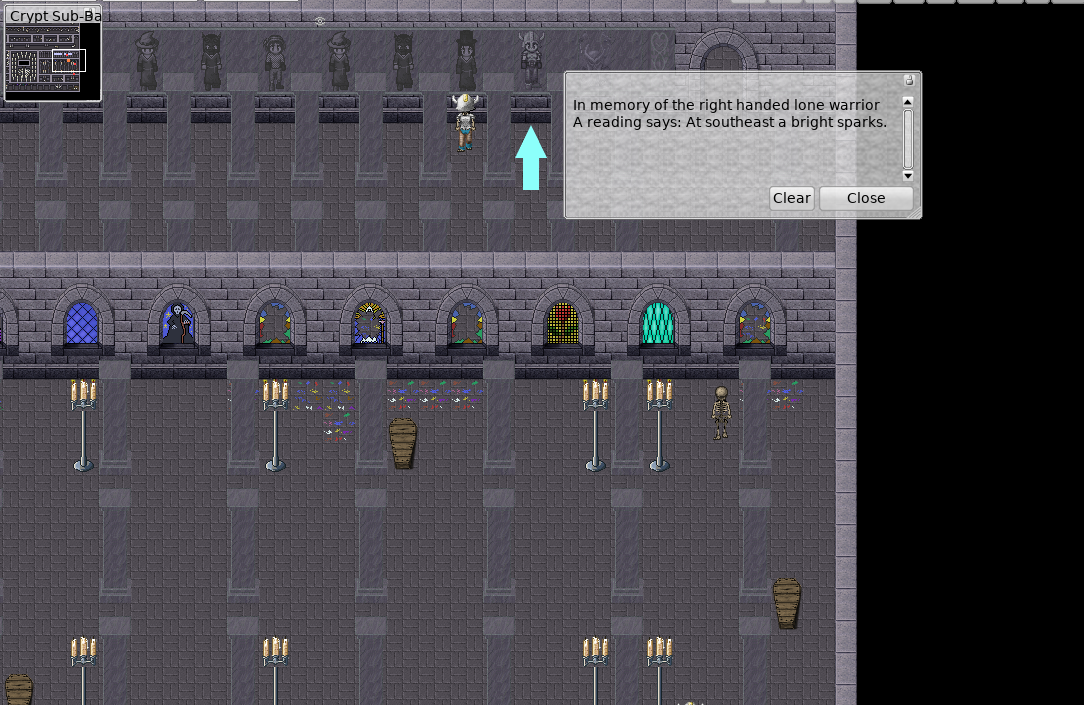
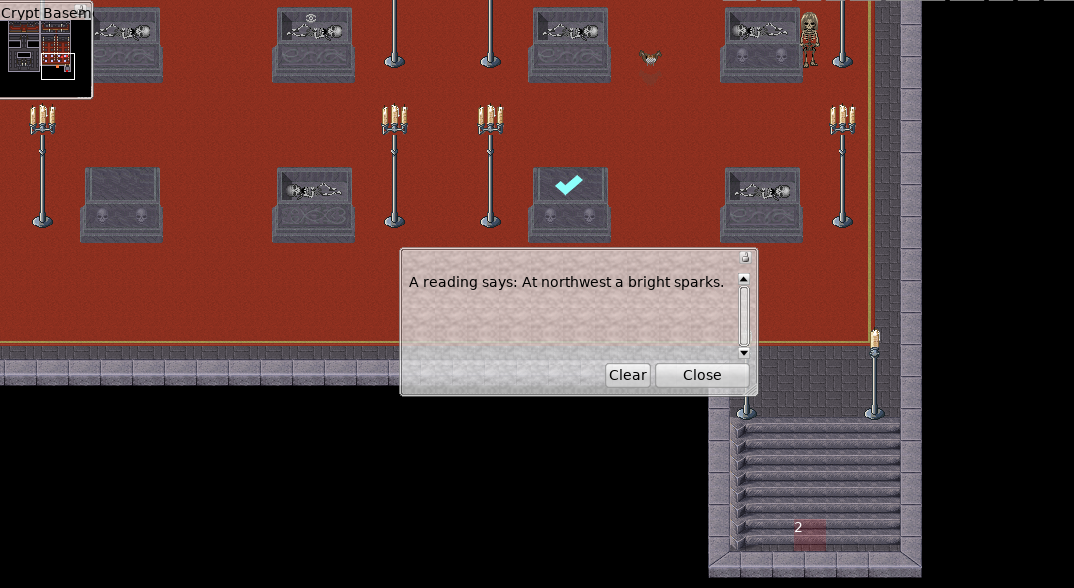
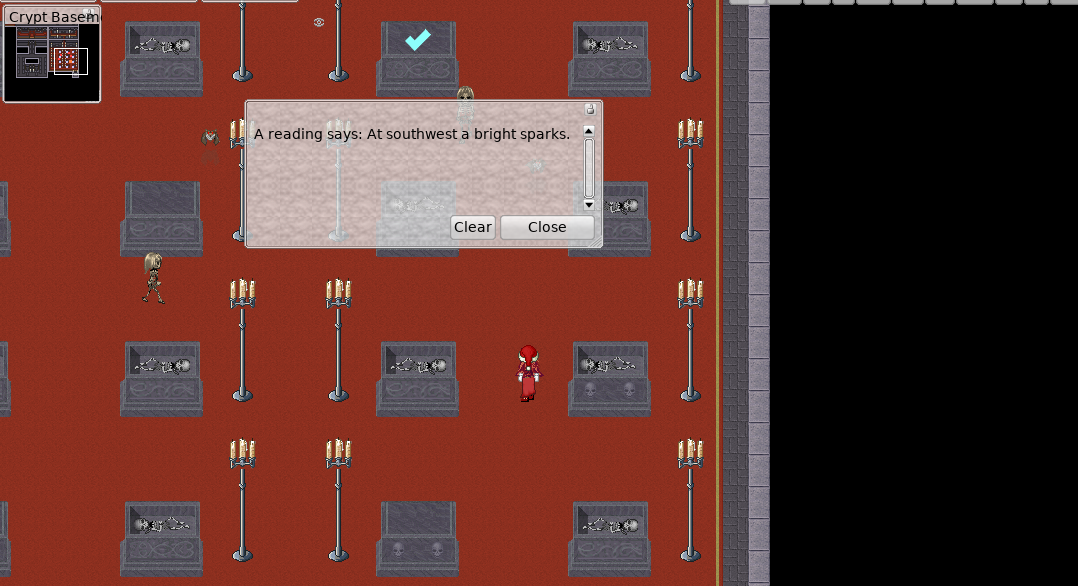
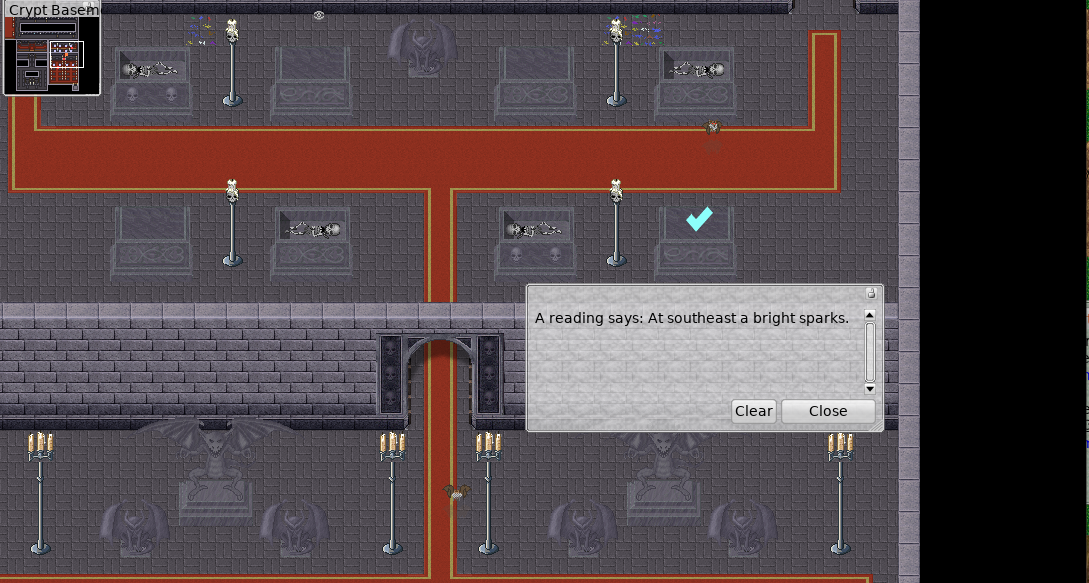
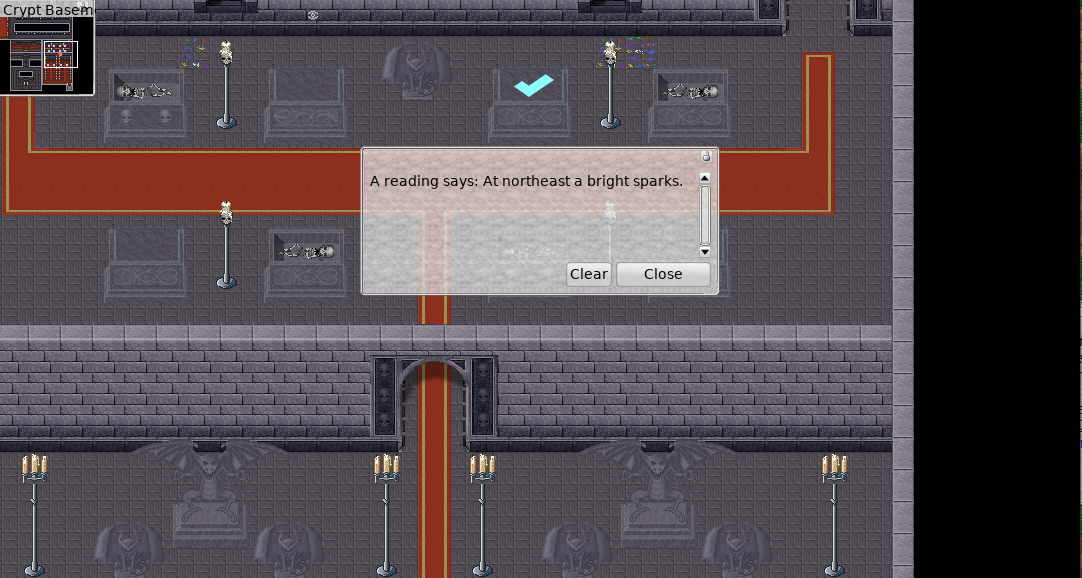
* Below are screenshots showing the locations of the clues containing the directionals. | |||
** Click on the things (NPCs) shown by the arrows and check marks. | |||
** Both left and right side examples are included, even though you only need to figure out the six directionals of one side for it to work. | |||
** Please note: The locations of the NPCs, and the order in which you need to click on them, are exactly as shown in the screenshots. They are the same for every player. Only the directionals vary. | |||
<div style="font-size:18px"> | |||
'''Left Side''' | |||
</div> | |||
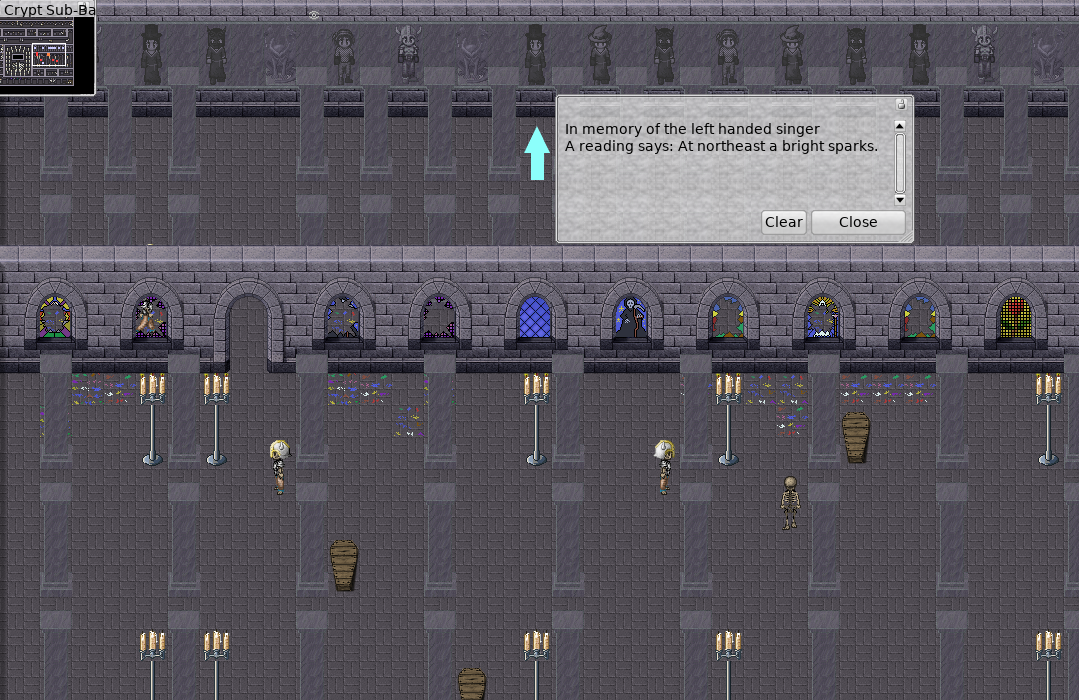
<big>Clue 1</big><br> | |||
Location: Basement level 2<br> | |||
Directional (example): '''northeast''' (NE) | |||
[[File:Left Side, Clue 1.png]] | |||
<br> | |||
<br> | |||
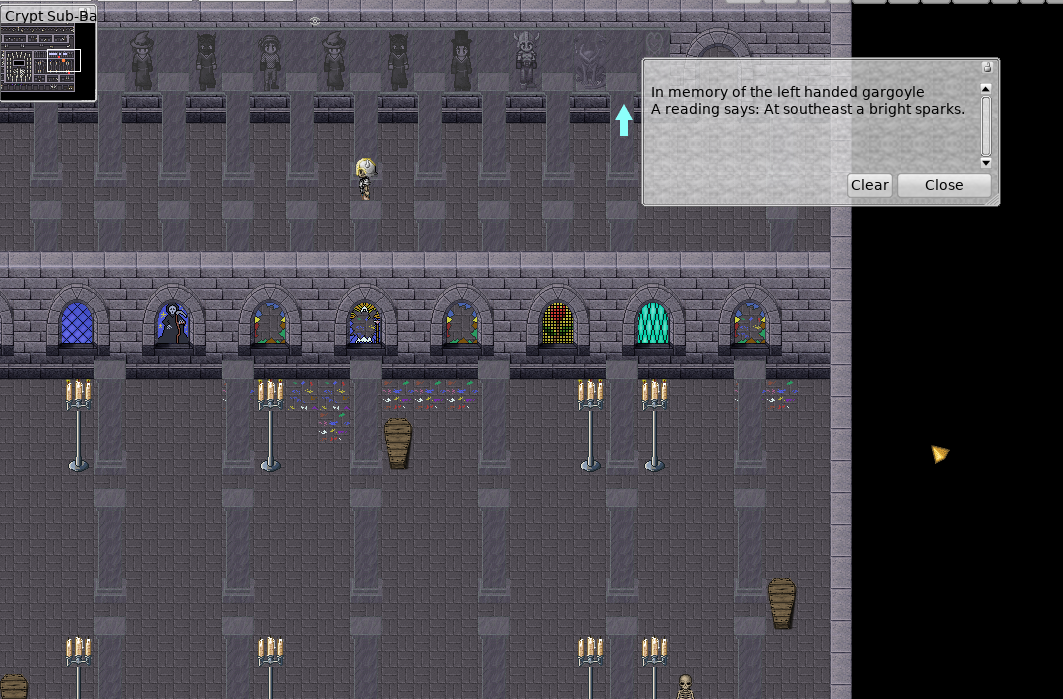
<big>Clue 2</big><br> | |||
Location: Basement level 2<br> | |||
Directional (example): '''southeast''' (SE) | |||
[[File:Left Side, Clue 2.png]] | |||
<br> | |||
<br> | |||
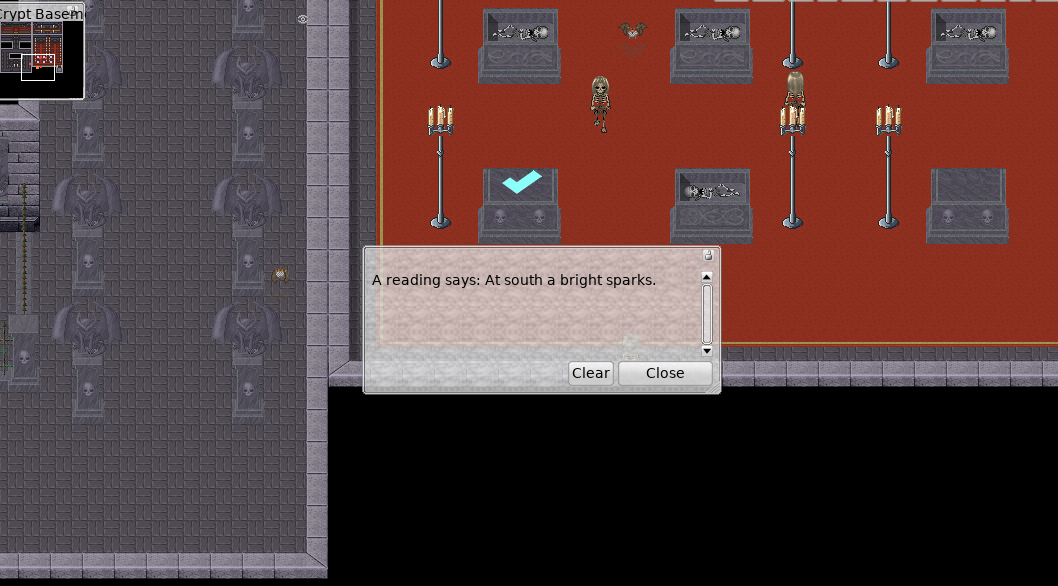
<big>Clue 3</big><br> | |||
Location: Basement level 1, on the left side of the room above the stairs to the lower level<br> | |||
Directional (example): '''south''' (S) | |||
[[File:Left Side, Clue 3.png]] | |||
<br> | |||
<br> | |||
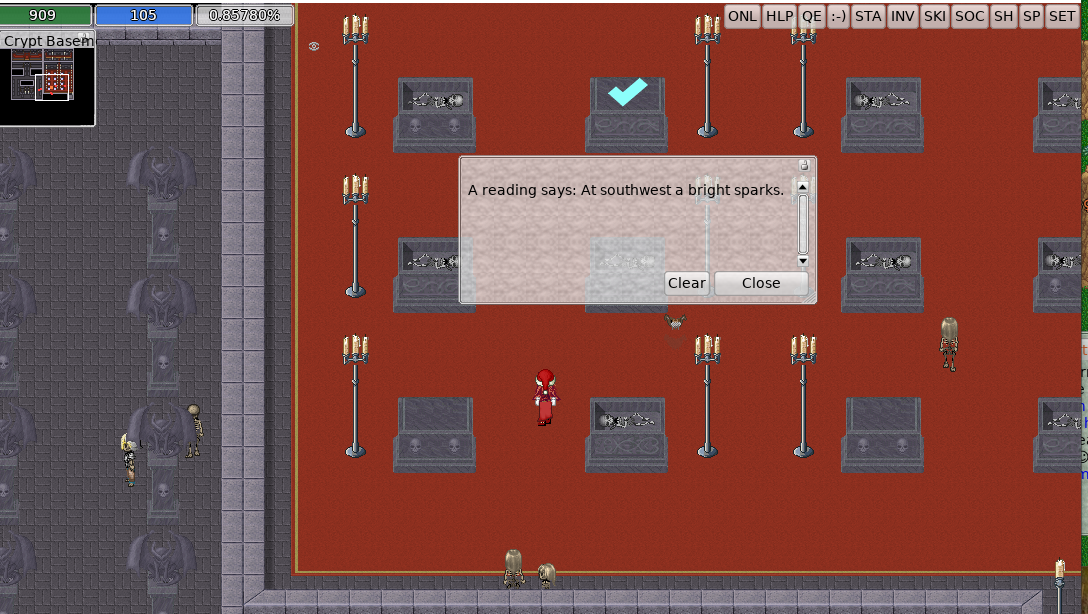
<big>Clue 4</big><br> | |||
Location: Basement level 1, on the left side of the room above the stairs to the lower level<br> | |||
Directional (example): '''southwest''' (SW) | |||
[[File:Left Side, Clue 4.png]] | |||
<br> | |||
<br> | |||
<big>Clue 5</big><br> | |||
Location: Basement level 1, on the left side of the antechamber to the previous room<br> | |||
Directional (example): '''southeast''' (SE) | |||
[[File:Left Side, Clue 5.png]] | |||
<br> | |||
<br> | |||
<big>Clue 6</big><br> | |||
Location: Basement level 1, on the left side of the antechamber to the previous room<br> | |||
Directional (example): '''northeast''' (NE) | |||
[[File:Left Side, Clue 6.png]] | |||
<br> | |||
<br> | |||
<div style="font-size:18px;"> | |||
'''Right Side''' | |||
</div> | |||
<big>Clue 1</big><br> | |||
Location: Basement level 2<br> | |||
Directional (example): '''south''' (S) | |||
[[File:Right Side, Clue 1.png]] | |||
<br> | |||
<br> | |||
<big>Clue 2</big><br> | |||
Location: Basement level 2<br> | |||
Directional (example): '''southeast''' (SE) | |||
[[File:Right Side, Clue 2.png]] | |||
<br> | |||
<br> | |||
<big>Clue 3</big><br> | |||
Location: Basement level 1, on the right side of the room above the stairs to the lower level<br> | |||
Directional (example): '''northwest''' (NW) | |||
[[File:Right Side, Clue 3.png]] | |||
<br> | |||
<br> | |||
<big>Clue 4</big><br> | |||
Location: Basement level 1, on the right side of the room above the stairs to the lower level<br> | |||
Directional (example): '''southwest''' (SW) | |||
[[File:Right Side, Clue 4.png]] | |||
<br> | |||
<br> | |||
<big>Clue 5</big><br> | |||
Location: Basement level 1, on the right side of the antechamber to the previous room<br> | |||
Directional (example): '''southeast''' (SE) | |||
[[File:Right Side, Clue 5.png]] | |||
<br> | |||
<br> | |||
<big>Clue 6</big><br> | |||
Location: Basement level 1, on the right side of the antechamber to the previous room<br> | |||
Directional (example): '''northeast''' (NE) | |||
[[File:Right Side, Clue 6.png]] | |||
|} | |} | ||
<div style="font-size:10px">(If the Spoiler does not open, press the F5 key on your keyboard.)</div> | |||
'''Instructions to get to Keshlam Swamp:''' | |||
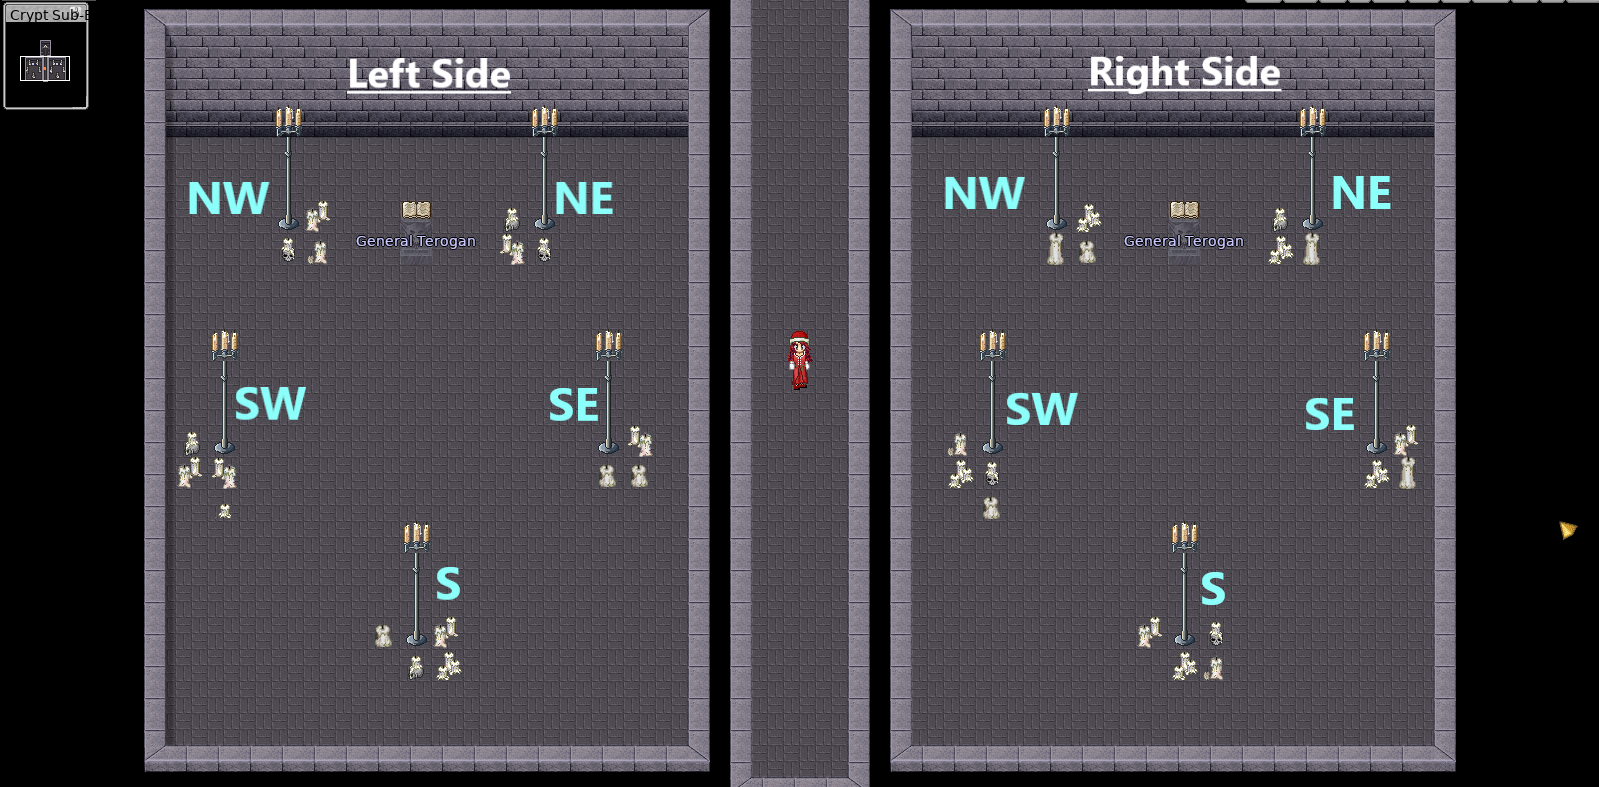
* After solving Alacrius' Riddle, go to Terogan's chamber at Basement level 3. Here you will use the knowledge obtained from the clues to finish the ritual. | |||
* Talk to the book at the top of the chamber, and select the left or right side of the room. | |||
* The spell used to light the candles is #reapercry. | |||
* You will need to start the battle with Terogan for the reapercry spell to work. For more info about starting the battle, see [[Classic:Crypt Third Boss Quest|Terogan Battle]]. | |||
* You must use the reapercry spell six times while standing next to the correct candles. The six directionals you uncovered will determine which of the candles you stand next to, and the order in which you do it. | |||
* There will be a red particle flash if you light the correct candle, and a black particle flash if you light the wrong one. If it flashes black, you will need to try again. | |||
<div style="font-size:24px;text-align:center;"> | |||
'''Terogan's Chamber''' | |||
</div> | |||
[[File:Terogan's Chamber.png]] | |||
<br> | |||
<br> | |||
'''Reward:''' | '''Reward:''' | ||
* Knowledge of how to enter [[ | * Knowledge of how to enter [[Classic:Keshlam Swamp|Keshlam Swamp]] | ||
'''Total Cost:''' | '''Total Cost:''' | ||
* None | * None | ||
[[Category:Quest]] | [[Category:Quest]] | ||
Latest revision as of 22:10, 4 September 2023
❝
This article is currently under construction.
Some of the links may not work. These will be fixed shortly.❞
Some of the links may not work. These will be fixed shortly.❞
This article contains information for players or people interested in playing on the Classic server. If you are looking for information for The Mana World, go here The Mana World.
See also the Classic Portal
| Quest Overview | |
|---|---|
 | |
| Starting Location | 027-2 The Crypt |
| Level | 90+ recommended 60 required |
| Prerequisites | 300 Boss Points |
| Redoable | No, only once |
What to Do:
- To get there, head to the Graveyard.
- Enter the Crypt and go to the room on the right to talk to Alacrius.
- Read the two books on the top floor and the book on Basement level 1.
- Examine the correct sarcophagi (coffins) on your way to Basement level 2.
- Examine the correct statues on Basement level 2.
- Examine all five gates on Basement level 3.
- Solve the riddle.
Hints:
- The 300 Boss Points are only needed once for each account. If it was done with one character all characters on the same account can use it in the ritual without getting the boss points and talking to Alacrius again.
- Have a pen and paper handy to write down what you learn from the clues.
- The gates on Basement level 3 (Words of God) will tell you the order in which to read the clues. Krukan's clues are the statues across from the unbroken windows on Basement level 2, and Razha's clues are the closed sarcophagi (coffins) on Basement level 1.
- You will need to lure monsters away while trying to read the clues. Go with a group of players or a high level friend into the crypt to increase your chances of surviving the monsters that guard the clues.
(If the Spoiler does not open, press the F5 key on your keyboard.)
Instructions to get to Keshlam Swamp:
- After solving Alacrius' Riddle, go to Terogan's chamber at Basement level 3. Here you will use the knowledge obtained from the clues to finish the ritual.
- Talk to the book at the top of the chamber, and select the left or right side of the room.
- The spell used to light the candles is #reapercry.
- You will need to start the battle with Terogan for the reapercry spell to work. For more info about starting the battle, see Terogan Battle.
- You must use the reapercry spell six times while standing next to the correct candles. The six directionals you uncovered will determine which of the candles you stand next to, and the order in which you do it.
- There will be a red particle flash if you light the correct candle, and a black particle flash if you light the wrong one. If it flashes black, you will need to try again.
Terogan's Chamber
- Knowledge of how to enter Keshlam Swamp
Total Cost:
- None
