| (29 intermediate revisions by the same user not shown) | |||
| Line 1: | Line 1: | ||
This feature is for experienced mappers, so if you are a beginner.... Do a map without automapping first, that helps you understanding what problems might occur, and what we are talking about in here. | |||
=What is the Automapping feature?= | =What is the Automapping feature?= | ||
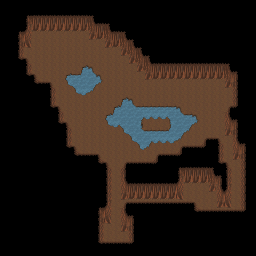
Guess you want to make a map, which looks this: | Guess you want to make a map, which looks this: | ||
| Line 19: | Line 22: | ||
How long does it take to make such an one-layer draft? 10 minutes? | How long does it take to make such an one-layer draft? 10 minutes? | ||
=Quickstart= | |||
- get a version of tiled, which supports automapping feature | |||
- get this data here: [[User:Argul/automapping/data]] or alternatively check the examples delivered with tiled | |||
- open example_cave.tmx in the maps folder. | |||
- edit the set layer with the existing tileset as you want. | |||
- click automap | |||
==create a new map== | - have fun | ||
=Theory behind the automapping feature= | |||
The automapping feature needs to know how the tiles have to be setup, to create the map. | |||
So we have got to create some rules how the map should be generated. | |||
These rules are compared to each possible position within the map, and there will be checked if the rule condition matches. | |||
If the rule condition matches, the rule output will be applied to the map. | |||
==Create a new map== | |||
Create a new map. | Create a new map. | ||
Save this map where ever you want. | Save this map where ever you want. | ||
I suggest the tmwdata/maps folder of the "tmwdata" project from our [[Git repository]]. | I suggest the tmwdata/maps folder of the "tmwdata" project from our [[Git repository]]. | ||
== | ==the rules text file== | ||
Within the same folder of your map there needs to be a textfile "rules.txt", | Within the same folder of your map there needs to be a textfile "rules.txt", | ||
which contains pathes to rulefiles. | which contains pathes to actual rulefiles. | ||
Example: | |||
[[Media:Automapping_example_rules.txt]] | [[Media:Automapping_example_rules.txt]] | ||
| Line 40: | Line 60: | ||
The rules will be applied in that order as in this file. | The rules will be applied in that order as in this file. | ||
So at first the rules in the very first line are applied. | So at first the rules in the very first line are applied. | ||
At last the very last line rules are applied. | At last the very last line rules are applied. | ||
== | You can also put another textfile again, which holds the actial rules | ||
[[Media:Automapping_example_rules1.txt]] | |||
==structure the rules.tmx== | |||
Now we need to make the rules with tiled and these rules need to be saved to the path given in the textfile of step 2. | Now we need to make the rules with tiled and these rules need to be saved to the path given in the textfile of step 2. | ||
But first we need to identify these rules: | But first we need to identify these rules: | ||
=== | ===defining a rule=== | ||
There must be a TileLayer called '''ruleRegions'''. | |||
In this layer you define regions, where the rules are found. | |||
Each coherent region of the same tiles describe one rule. | |||
It does not matter which tiles are used for describing where the region is, but these tiles must be all the same. | |||
(decision is boolean: either there are tiles or not) | |||
===defining a precise condition=== | |||
A rule should only be applied to certain places in you map, where certain conditions are matched. | |||
== | |||
= | |||
To define these conditions you can have '''ruleSet''' and '''ruleNotSet''' tile layers. | |||
There can be multiple layers with the same name, so multiple layers of '''ruleSet''' and '''ruleNotSet''' are possible. | |||
Basically in '''ruleSet''' you can put the tiles which have to be matched, that this rule condition gets matched. | |||
In '''ruleNotSet''' you can put the tiles which must not occur, so that the rule condition is true. | |||
===defining the rule output=== | |||
We need layers describing the terrain in the rule. | |||
So what output is expected to be put in the map, when this rule matches its condition? | |||
These layers have the nameformat '''rule<X>_<Y>'''. | |||
So this is the prefix '''rule''', followed by a random character sequence (must not contain an underscore), followed by an underscore, followed by another charater sequence. | |||
'''<Y>''' is the name where this layer information is copied to. So when you have a rule which should set up the "Ground" layer, | |||
this layername should be "rule_Ground". | |||
'''<X>''' gives the a unique name for a output possibility. It can be anything, even empty. | |||
When there are different names found, this rule will have different output possibilites. When the output consists of multiple layers, all layers of the same name are taken. The actual possibility (name) is then chosen by chance. | |||
=examples= | |||
[[User:Argul/automapping/examplecave]] | |||
Latest revision as of 08:30, 30 July 2011
This feature is for experienced mappers, so if you are a beginner.... Do a map without automapping first, that helps you understanding what problems might occur, and what we are talking about in here.
What is the Automapping feature?
Guess you want to make a map, which looks this:
So you have an idea how the form of the cave is. Now you must create this map. How long does it take? maybe an hour?
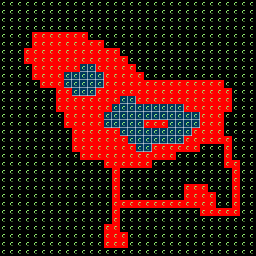
With the automapping feature you just draw the outline of the cave which looks like this:
What are the advantages?
- just one layer to edit
- just draw what you mean there should be (cave in the middle with a little sea)
- no need for drawing and combining many tiles for the wall. This is done automatically
So this feature generates from the given draft the cave. How long does it take to make such an one-layer draft? 10 minutes?
Quickstart
- get a version of tiled, which supports automapping feature
- get this data here: User:Argul/automapping/data or alternatively check the examples delivered with tiled
- open example_cave.tmx in the maps folder.
- edit the set layer with the existing tileset as you want.
- click automap
- have fun
Theory behind the automapping feature
The automapping feature needs to know how the tiles have to be setup, to create the map. So we have got to create some rules how the map should be generated.
These rules are compared to each possible position within the map, and there will be checked if the rule condition matches.
If the rule condition matches, the rule output will be applied to the map.
Create a new map
Create a new map. Save this map where ever you want. I suggest the tmwdata/maps folder of the "tmwdata" project from our Git repository.
the rules text file
Within the same folder of your map there needs to be a textfile "rules.txt", which contains pathes to actual rulefiles.
Example: Media:Automapping_example_rules.txt
Each line give a path to rules. This path can (should) be relative to the directory with rules.txt and your map. The rules will be applied in that order as in this file. So at first the rules in the very first line are applied. At last the very last line rules are applied.
You can also put another textfile again, which holds the actial rules Media:Automapping_example_rules1.txt
structure the rules.tmx
Now we need to make the rules with tiled and these rules need to be saved to the path given in the textfile of step 2.
But first we need to identify these rules:
defining a rule
There must be a TileLayer called ruleRegions. In this layer you define regions, where the rules are found.
Each coherent region of the same tiles describe one rule.
It does not matter which tiles are used for describing where the region is, but these tiles must be all the same. (decision is boolean: either there are tiles or not)
defining a precise condition
A rule should only be applied to certain places in you map, where certain conditions are matched.
To define these conditions you can have ruleSet and ruleNotSet tile layers.
There can be multiple layers with the same name, so multiple layers of ruleSet and ruleNotSet are possible.
Basically in ruleSet you can put the tiles which have to be matched, that this rule condition gets matched.
In ruleNotSet you can put the tiles which must not occur, so that the rule condition is true.
defining the rule output
We need layers describing the terrain in the rule. So what output is expected to be put in the map, when this rule matches its condition?
These layers have the nameformat rule<X>_<Y>. So this is the prefix rule, followed by a random character sequence (must not contain an underscore), followed by an underscore, followed by another charater sequence.
<Y> is the name where this layer information is copied to. So when you have a rule which should set up the "Ground" layer, this layername should be "rule_Ground".
<X> gives the a unique name for a output possibility. It can be anything, even empty. When there are different names found, this rule will have different output possibilites. When the output consists of multiple layers, all layers of the same name are taken. The actual possibility (name) is then chosen by chance.

